Showing posts with label i made a thing. Show all posts

19 May 2014

Style + I Made A Thing // Minnie Mouse Skirt

I've always admired how my Mama could whip up a dress on a whim, make a blanket, make our pajamas when we were babies, etc. She taught me to sew ten years ago and for some reason I just got around to asking her to teach me how to make clothes. I picked a pattern for a dress that seemed fairly easy to do with my basic knowledge of sewing. It was the Cynthia Rowley Party Dress Simplicity 1873, but the fabric I had ordered for a dress was about 1/4 of a meter too short so we decided to make a skirt instead. I just followed the steps for the bottom half only, omitted the pockets and zipper, and added elastic to the top for a stretchy waistband. It took me an afternoon and the end result was very rewarding!
You'll have to excuse the silly faces I'm making. It appears that I'm angry but the sun was just setting when we took these photos and I have sensitive eyes so I have a permanent squint in the day time haha.
I'm wearing: Top + Tights // Walmart (old), Skirt // Handmade, Belt // Modcloth, Headband // Forever 21, Shoes // Steve Madden (similar), Anchor Necklace // Gift
I got through sewing the skirt with minimal frustration, which is actually pretty good for me. I've cut things up in a fit of rage before. While I do love the fullness of this skirt and how twirl worthy it is, I don't wear it often because it feels like a lot of fabric and gets annoying after awhile, and I think would translate better as a dress. I found a really easy a-line skirt tutorial so I'm gonna give that a whirl next as it's very little fabric in comparison. Still feeling very proud of myself even though I made this months ago. Can't wait to see what else I can sew up for summer! xo

25 March 2014

i made a thing // woodland fairytale pouch


This isn't an unusual thing for me to sew. I've made so many flat bottom pouches I can't even count. But, I needed a bigger pouch for my nail tools, and I really love how this one turned out. This woodland fairy tale fabric is the cutest for just about anything. Half Little Red Riding Hood and half Goldielocks and the Three Bears, so adorable! And even though its childish, I chose it because it's really colourful, much like my nail polish collection. It has a nice sunny disposition and makes me happy. 


Spoiler alert - I am no good at making wristlets. Almost every one I've made has broken and it makes me terribly sad. My sewing machine just isn't strong enough to reinforce the fabric around the hardware. I'm hoping this one withstands the test of time, as I do like to bring my nail tools with me to friends' houses. This is also the first time I've top stitched a zipper and I must say, it does give the pouch a much cleaner look. 


I was thinking of making a wrap up pouch for all my nail tools but I'll save that project for another time. I need to find a good pattern instead of guessing. This pouch inspired me a little to get back into making new items for my shop. It's hard when you're on the fence about keeping your shop open and adding new items, or closing down to focus more on your blog. Ah, the woes of an Etsian blogger.

26 February 2014

I MADE A THING // BASIC WALLET


Lately I've been really lacking inspiration for crafts and have looked into doing new items, for myself and for my Etsy shop. I bought this easy PDF pattern for a basic wallet (since retired and no longer available) from the lovely Michelle Patterns. It sat in my inbox for almost a year until last night when I decided to try it out. I honestly do not know why I waited so long to make this! It's SO simple and the end product is adorable. 

The idea of this wallet is so simple and it will be very useful in so many ways. It easily fits my iPhone 5c, keys and money, and I would assume it would comfortably hold a pocket camera. In my case it would be absolutely PERFECT for concerts as it would snugly fit my gig essentials (but we'll save that topic for another time).


When ever I try something new, the prototype is always a bust. This is the first time my first attempt at something went pretty smooth. Aside from accidentally pressing the Velcro and thus melting half the loops (oops!) it's perfect. I still need some practice with my top stitching because I don't do it very often but I think after a few more tries, I might start selling these if anyone is interested. This would be an awesome DIY, but I wouldn't feel right sharing the tutorial as it's not mine and I bought the pattern off someone else. You can, however, find lots of tips and tricks for sewing on Michelle's blog! P.S Isn't this donut fabric the best?!


Would you like the basic wallet to be available in my Etsy shop?
Also, don't forget about the Half A Whale Sale!

18 February 2014

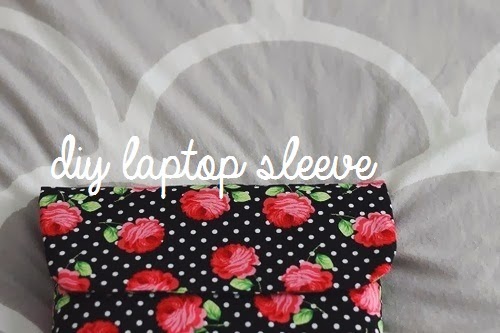
I MADE A THING // ROSEY DOTS LAPTOP SLEEVE


Hiya kids, and welcome to a new series I like to call "I Made A Thing!", where I like to show off all the new things I've learned to sew, bake, create, etc. It may even include a DIY from time to time if I've made it in good lighting and can take photos of the process. Last night I felt very creative so I decided to make a padded sleeve for my laptop. It's actually quite simple and requires little skill. 

I had a good inkling of how to make one of these, as it's pretty much the same thing as my iPhone sleeves, just a lot bigger in size and with a flap. I decided to Google DIYs just so I had something to follow, and I found this tutorial from Amy A La Mode, which is a very good how to for anyone who wants how to that can be adjusted to fit any size of laptop. Following her steps was quite easy and she is pretty good at explaining things. Demonstration photos are also a plus! I tweaked it up a bit to suit my wants (which you can see below) and rounded the corners of my flap. I also used velcro patches instead of sewing in buttons. The pattern ended up being a bit too large and fits my laptop loosely, but that could have just been my measuring. 


The best part about this, is that you only need 1/2 yard each of your exterior and lining fabric plus quilt batting and whatever enclosure you choose (velcro, buttons, strap etc.) Simple and cheap! My kind of laptop case. I love this fabric so much and couldn't decide what to do with it - use it for myself or add things to the shop. Finally I decided to get a little selfish with it and make myself something for once. I also didn't want one of those ugly black and bulky laptop cases you can get at the store, because, well, that's just boring. Plus, doesn't it look adorable? (Don't mind my kitchen or my stack of drying dishes haha) 


Looking back on it, I feel like I may have had an easier time sewing it how I sew the phone sleeves so I might try making another one that way, if anyone is interested in me sharing a tutorial! 

Have a great Tuesday! xoxo
© Northern Flicker Co.
Design:Maira Gall.